
Step #1: Summary of Project
I made a slideshow about myself to demonstrate my knowledge on how to make a decent presentation that doesn’t put people to sleep. I learned more about what the human brain pays attention to, listens to, and reacts to, which helped me put together a slideshow that not only teaches people about myself but makes the information stick. If you want to know how to make a presentation that doesn’t suck then keep scrolling!
Step #2: What is Good Presentation?
Notes
- Identify the core idea of the message
- “adopt a beginner’s mind”
- Get away from tech in order to focus on the main idea
- What’s important? does it support the core? does it help the story or distract?
- Keep it simple and visual
- Brainstorming
- Messy but works
- Grouping
- Find themes and identify core
- “the one thing you really want to say”
- Never lose track of key message
- Storyboard
- Away from computer
- Map out groups/ideas on paper with visuals
- Why not just start on the computer?
- Advantage is you can step back from it, move it around, tape it to the wall, is more real, etc.
When watching the sample presentations, the most common principle found in each was to keep it simple. One word or one picture per slide makes it easier for an audience to keep up, to understand, and to be engaged. “Make the slideshow lateral, not vertical.”
Making a good presentation is no piece of cake, you have to know what you are doing and do things for a purpose. When making a presentation, one of the key components is to make it interesting. Not many people can honestly say they’d like to watch a 64-slide presentation about a person, but if you make it engaging and memorable then it will hopefully have been worth their time. Presenting things is our way of sharing our knowledge with other people. Without presentations, we wouldn’t be able to learn as much from each other. That is why being a good presenter is a valid skill no matter what your doing, and the better the presenter, the more effectively knowledge is being shared with others.
Step #3: Brainwriting and Brainstorming Ideas
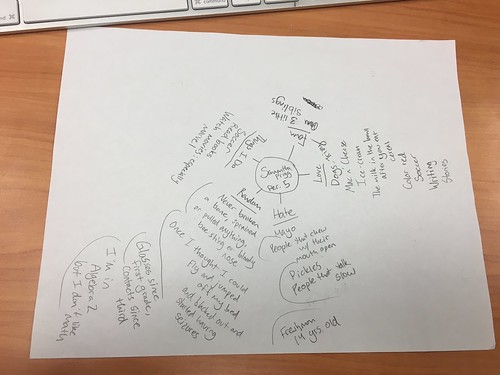
Brainwriting is a good place to start when you need to lay out your ideas. When you brainwrite, you simply make a circle in the middle with your topic and around that jot down every idea and detail about your topic that is relevant. Brainwriting is a tool to put the thoughts we have in our head out on paper, and it is the beginning step of making a presentation.
After doing a brainwrite, the next step is to brainstorm. Brainstorming is an extroverted activity, where you share ideas with the people around you to help you add to your brainwrite. That way you can write down things others thought of but you didn’t, therefore making both you and your peer’s presentations better.
Step #4: Creating the Storyboard
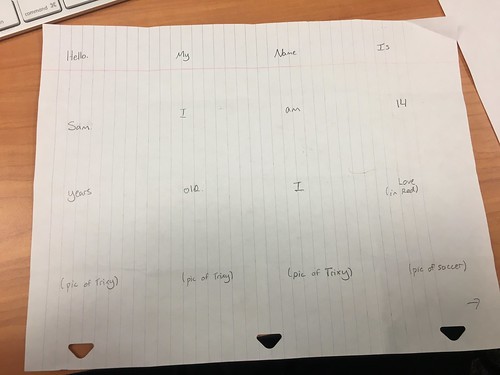
Making a storyboard is basically taking all the ideas you wrote on your brainwrite and putting them in an order that makes sense. To do this you fold your paper into sixteenths to make “slides”, and then you write your ideas in the squares as you would present them. We use the story boarding technique because it lets you organize your ideas in a way you would present it.
Step #5: Gathering and Citing Images
Citing your images is a valid step in creating a presentation, and if you don’t do it correctly then you could break the law. So, to stay away from that, get your pictures from the Creative Commons. Since you always need permission to use copy written material from the creator, we use the Creative Commons because the creators have already given permission to use their work as long as you cite them. (Copy written material is a legal term given to creators for their artistic works.)
Example of citation: Felipe Hanower. Pizza. N.d. Flickr.com. N.p., n.d. Web. 17 Sep. 2017.
Step #6: Creating the Master Slide
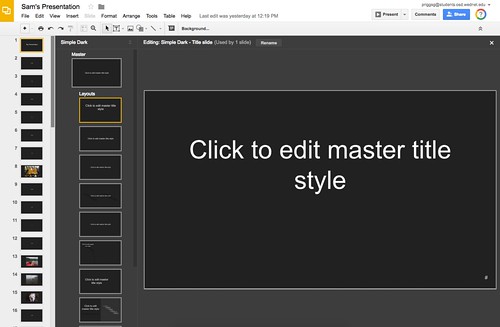
Once you start to make your slideshow, you want to set the master slide first before anything else. The master slide is the formatting to the rest of your slides, so that way all your slides look the same. If your presentation doesn’t look the same, it distracts the audience and they start to only focus on what you messed up on, and not what looks good. Also, when making your slideshow remember to keep it simple, with one to two words per slide, and that high contrast is best, like white letters on a black slide.
Step #7: Building the Slide Show
You finally get to make your slideshow! When building up your slideshow, look off of your storyboard, as it is the basis of your presentation. Also, base your slideshow off of the SUCCESs Model created by the Heath Brothers in their book Made to Stick, Simple, Unexpected, Concrete, Credible, Emotional, stories. If your presentation hits each of those words, then you are on the right track. Then, create all your slides, but instead of adding in pictures put words instead, for example (pic of soccer ball), or something like that on each slide that should have a picture. This way you get the presentation done and you have the foundation and then you can go back in and add what you need to, kind of like adding icing to the cake.

Step #8: Sharing the Slide Show
Once you are ready to share your slideshow with the world, upload it to SlideShare.net because it lets anyone view your slideshow whether they have the presentation software or not. This lets you increase your audience while making it convenient for them and yourself.
https://www.slideshare.net/SamanthaPrigg/my-presentation-80001770
Step #9: Preparing to Present/Pitch
Finally, you have reached the final phase, presenting the presentation. Don’t worry, if you follow a couple easy steps you will be the best presenter your audience has ever seen. First, “for every minute of presentation you need at least 20 minutes of preparation”. Basically, the more you practice with your slideshow, the better it will go. Second, only say what you want the audience to remember. Instead of focusing on saying every detail, focus on getting your core point across. Lastly, have fun with your audience! No one likes a bland, monotone presentation or presenter, so don’t be afraid to spice things up.
Step #10: What I Learned
This presentation has taught me many things that I will always keep in mind. Since presenting is such a valuable skill, the knowledge of how to be a good presenter and make a good presentation will support me for the rest of my life. When making a presentation I learned how to brainwrite, brainstorm and storyboard to help get my ideas going. I then learned how to compose a slideshow so that it is effective and impactful by keeping it simple and sticking to the core ideas. Lastly, I learned how to be a good presenter. The more you practice presenting your slideshow, the better it will flow. All in all, I learned lots doing this project and it will come in handy in my future.