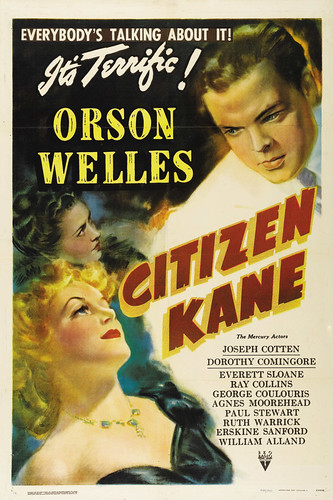
CC image Citizen Kane Poster by Phil Nelson at Flickr
Summary
The goal of this project was to use our knowledge of mise-en-scene, cinematography, editing, audio, narrative, genre and more to create an analysis of a scene of the movie Citizen Kane. After analyzing it, our team of three (screenwriter, cinematographer, editor/audio guy) made a short documentary going into depth in one of the fields. Our team decided to talk about the blocking of the actors, which falls under mise-en-scene, and we analyzed Scene #2 of the film. To do this we made a screenplay telling what we would talk about and what clips from the film we would use. We then shot and recorded the clips we needed for the documentary, and afterwards we edited them and added in clips from the film. Our final product is a short documentary on the blocking of the characters in Scene #2 of Citizen Kane.
The Film
Screenplay/Shot List
As the screenwriter, I wrote the screenplay for the documentary we created. The screenplay is in audio-video format, and includes a plan of the shots we used in the final product. In this sense it also acted as sort of a shot list. Even though we only filmed one shot (which is listed on the screenplay), we also used clips from the movie Citizen Kane, and the times of the clips are listed on the screenplay to make it easier for the editor when she adds them in. Below are screenshots of the screenplay.
Camera Position/Movement
As we were filming we decided to add in another angle (which wasn’t in the screenplay and was just an on-the-spot decision), and we decided that a side angle would add some depth to the documentary. Below are some pictures of the different angles we used.
Reactions to the Final Version
After viewing our video, some of the reactions I received from other screenwriters were:
The dialogue/narration had a really nice flow to it and moved and fit together nicely. – Dawson
Using different camera angles added an aspect of depth that was cool. – Drew
The analyzation of the scene included some “why’s” and “how’s” along with the “what’s” but needed some more. – Jordie
What I Learned and Problems I Solved
By doing this analysis of Citizen Kane, I learned a lot about the filmmaking process. As a screenwriter, I had to work on my writing skills. I learned more about writing a screenplay in the audio-video format and I got much better at that. I also improved in my decision making skills because as the screenwriter I was in a way the director of the project, and I had to decide what clips we used and what we would talk about in the documentary. Lastly, I learned more about how to analyze a scene of a film and what details people pay attention to when they make a movie. Along with learning things, we also had to solve some problems along the way. One of them was the fact that I was too short while filming and the tripod wasn’t able to go any lower, so we stacked six chairs on top of each other and I sat on those to make myself taller.
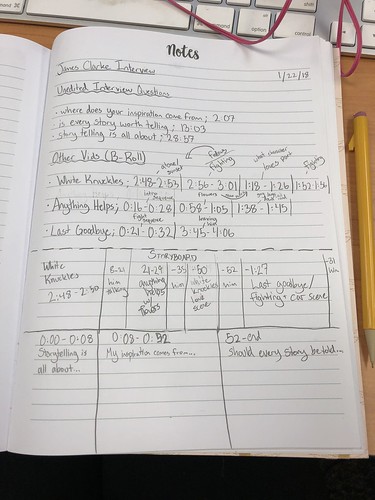
For this project we were each given an unedited thirty minute long video of an interview of James Clarke. We were also given several of James Clarke’s videos to use for B-Roll. Using these resources, we planned out which videos and what parts of each video we wanted to use for our final, two minute-ish long video. (The requirement was three interview questions/segments and three cutaways to three different video assets.) We then cut out the um’s and ah’s, picked out the parts we wanted and added B-Roll, background music and a title using Premiere Pro.
Collating Files and Storyboard
Project Skills Evidence
What I Learned
By doing this project, I learned a lot more about how to find my way around Premiere Pro. I had never used Premiere Pro before this project, so I had to watch and takes notes on a couple video tutorials on editing. This helped a lot on how quickly I could get stuff done, as keyboard shortcuts make all the difference. I learned how to add a title in, how to lower audio levels, what a ripple edit is and how you do it, what a morph cut is and how you insert it, and so many other cool and helpful tools that helped make my final product. A small problem I had to solve while I was editing was when once I accidentally deleted over half my project. I started to freak out and frantically Googled if there was a back button, and luckily I found it and saved my project.
0:00 – Scene begins with Kane playing in the snow because he is the focus of the scene/what adults are talking about, zooms out to view three adults talking about him (adoption); Charlie is in all black to contrast him against his white and grey snowy background
0:19 – Mother is largest in frame because she is the dominant of the conversation, with the two men in the middle ground; the mother and Mr. Thatcher are both in dark black clothes while the father is in white to show the sides of the argument, the father is arguing to keep the child while the mother is signing him away to Mr. Thatcher
0:28 – Kane in background as little kid behind all three adults, gives of vibe of innocence because of small size in shot
0:29 – Father has his hands in his pockets, sign of uncertainty in the character
0:45 – All three characters are angled towards Kane in window in first third (rule of thirds) of the shot because he is the focus of the adults’ conversation
0:45 – Mother and Mr. Thatcher are sitting down as they are on the same side, agree that Kane should leave their current household while the father is standing up and arguing/disagreeing with the other two
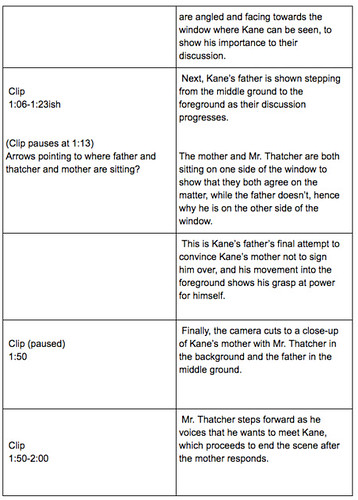
1:12 – Moves closer towards the table in a final act to get them to understand; “i’m asking you for the last time”
1:33 – After he finally agrees after being offered money he becomes small in the frame and moves to the background
1:43 – After the mother signs the papers, she walks to the window and suddenly is very small in the frame compared to the other two characters, referencing how defeated she must feel after signing over the rights to her child
1:47 – Cuts to close up of mother looking out upon her son with the father slightly larger than Mr. Thatcher in the background of the mother. She is the dominant of the frame
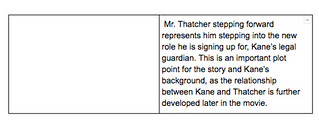
1:53 – Thatcher steps forward in frame as he asks to meet the child, signifies growing/asserting dominance, important plot point
Sound and Editing: Notes
Editing
Continuity editing
Cut
Dissolve
Used commonly by George Melies – A Trip To The Moon
Parallel action
Cutting back to a different story that takes place at the same time
“meanwhile, back at the ranch…”
Forms understanding and appreciation of both stories
Ex. Star Wars
Classical cutting
Cutting to several different angles/characters/locations to give details to the story
Montage editing (pioneered by the Russians)
The juxtaposition of images to create new meaning not found in either individual shot by itself
“2+2=4”
Focus is on edits/movement of pictures
Discontinuity editing
Meaning through juxtaposition
Emphasizes dynamic, often discontinuous relationships between shots
Kuleshov Experiment
Sound
Convey:
Space
Location
Mood
Character’s state of mind
Meaning and information to the viewer
Sound: Analysis
0:00 – Charlie’s voice is dominant, shouting/playful
0:11 – Charlie’s voice fades into background but remains present to convey location of characters in relation to eachother as his mother and Mr. Thatcher begin to talk, kane’s voice remains as a constant background noise for the rest of the clip until his mother shouts his name
0:20 – Sound of footsteps and creaky wood floors as the adults walk to the table to convey more about the location (old, wooden house)
1:09 – Rustling of papers as the mother signs them
1:45 – The mother opens the window and one can hear the sound of wind go by, referencing the snow storm taking place
1:46 – Close-up of the mother looking outside the window at Kane (offscreen), high pitched, eerie sounding music starts to play in background to intensify the mood, as mother shouts Charlie’s name his shouting in the background stops and there’s a moment of silence
Moment of silence, beginning of sad music, action of Mr. Thatcher taking a couple steps forward to become bigger in frame and him asking “don’t you think I’d better meet the boy?” all signifies an important plot point of the story, when Kane is taken away from his home
1:55 – Right after Thatcher asks to see child, pitch of background music drops and signifies the growing/intensifying dread
Editing: Analysis
1:45 – First and only cut of scene, straight/classical cut from backs of three characters to close up of mother with other two in the background to show significance of the emotion in the mother
Cinematography: Notes
Key light: illuminates one side of subject and gives shadow to other
Low key lighting: high ratio
Used for crime dramas, horror films and other more dramatic movies
Fill light: fills in shadows on side that is shadowed by key light
Low ratio: high key lighting
Used for comedies, less dramatic movies/scenes
Hard light: comes directly from source
Good for scary, serious, tense
Soft light: diffused, hits subject from variety of different angles, made by bouncing light of something
Used on glamorous stars, romantic situations and happier moments
Back light: light is behind subject
Abstracts subject
Used for scary characters
Edge or rim light: makes subject stand out from background
Frontal light: light is at same place as camera, leaves features looking flat
Halloween light: light shines up from under subject
Makes subject look threatening, scary, distorted
Like dutch angle of lighting
Proxemics=shot distance
Shot types molds our viewpoint
Close up people: more significant
Greatest dramatic impacts
Extreme long shot: dominated by background information
Any people are usually two small to recognize unless with context
Long shot: who what or where shot
Establishing shot: who is is scene, where they are in relation to everyone else, where they are, etc
Medium long shot: frames subject from knees up
Medium shot: waste up
Reduces background
Conveys interaction between characters
Close up: purely subject, no background
Punctuates impactful moments
Extreme closeup: close up but closer
Close up of object gives an object symbolic value, makes audience know that it is important
Camera angle: level/height of camera in relation to subject
Eye level: very neutral
How our eyes see things
Low angles: camera is lowered, shooting up at subject
Portrays subject as powerful and threatening
Portrays someone impressive or heroic or admirable
“I look up to ____”
Low angle an be use differently according to context
High angle: camera is looking down on subject
Makes someone look vulnerable or weak
Extreme high angle: camera is placed directly above camera
Makes audience disoriented
Dutch angle: slanted camera angle
Makes audience feel unbalanced
Tilt: camera pivots vertically up and down on stationary axis
Pan: camera stays n one spot but pans over subject left to right
Tracking shot: camera moves with subject
Crane shot: makes camera unbound from natural bounds
Handheld: shaky look
Creates sense of realism or documentary vibe
Zoom = amateur
Looks artificial because relation of background and subject doesn’t move
Moving camera: found in movies
Looks more realistic and cinematic
Cinematography: Analysis
Camera Angles and Movement
0:05 – Camera track backwards and upwards from Charlie in the snow to reveal his mother and then Mr. Thatcher a couple seconds later
0:14 – Camera is continuing to track backwards at an eye level angle, reveals father, all three characters start to walk backwards towards the table
1:09 – Camera angles upwards to keep father in frame and to show his dominance as he approaches the table in a final plea
1:25 – Camera angles down to the mother signing the adoption papers, father’s upper half is no longer in frame, in a way cuts him out after he finally agrees
1:33 – Camera moves upwards with mother as she stands up, Mr. Thatcher stands up right after he, camera is clearly focused on tracking mother’s movements as she is the dominant of the shot
1:39 – Camera tracks with Mother back to window as she looks/calls to Charlie outside
Shot Types
0:00 – Begins with long shot of Charlie playing in the snow, gives a sense of where he is in relation to the house, and the location of the house (somewhere snowy/wintertime)
0:15 – As camera moves backwards, introduces the three characters inside the house with a medium-long shot; conveys the interactions between the three characters but also gives a small sense of setting and relation to Charlie outside by including the window in the shot
0:29 – After characters sit down, moves to a medium shot of Mr. Thatcher and the mother while the father continues to stand in the frame showing from the knees and up
1:43 – As the mother walks to the window with her back to the camera, she becomes full size in the frame while the other two characters are shot from the mid-thigh and up
1:46 – Cuts to close-up of the mother looking out upon her child, meant to intensify her emotions, Mr. Thatcher is in the background while the father is in the middle ground until Mr. Thatcher moves forward to closer to the middle ground
Lighting
0:00 – Begins with Charlie filmed with high-key lighting, portrays a happier and more neutral mood, not a lot of shadows
0:17 – Light is comming from almost directly from the left side of the characters (our right side) and is leaving one half of their face in almost complete shadows **meaning?
0:29 – After sitting down at the table the characters are now illuminated in 3-Point lighting and soft light, with not a lot of shadows but still some
1:49 – After cut to close-up, lighting seems very flat, not a lot of shadows
Narrative and Genre: Notes
Narrative: the story
Narration: the act of telling a story
Narrator: who or what tells the story
“The narrator delivers the narration that conveys the narrative”
In every movie the camera is a narrator
Camera narration
Some movies use more than one narrator
First person narrator: a character in the narrative who typically imparts information in the form of voice-over narration
Diegetic: what is in the world of the film
Non-diegetic: things that are added in to build on the diegetic stuff, like soundtracks and titles
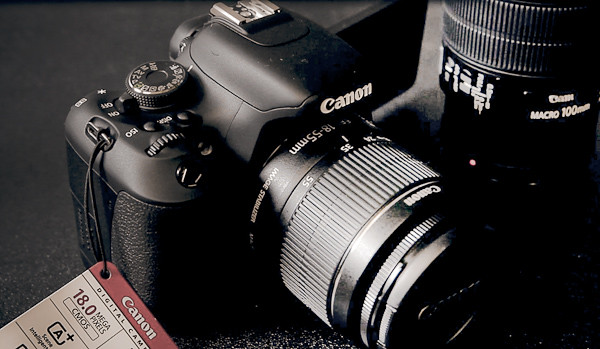
For this project, our team of four (director, cinematographer, editor, screenwriter) created a short documentary on how to use a Canon T3i camera and set basic filming settings. By doing this project we got to practice filming hands-on and work on learning more about the process of film making.
Terms, Concepts, Notes
Ambient Light – the natural light in a scene
Aperture Priority – a camera setting that allows the user to control the aperture, leaving the shutter speed to be automatically determined
Bokeh – the appearance or “feel” of out-of-focus areas
Bulb “B” Setting – a camera setting where the shutter will remain open as long as the release button is depressed
Butterfly Lighting – lighting where the main light is placed high, in front of the face, aimed at the center of the nose
Complimentary Color – pair of primary/secondary colors opposed to each other on the color wheel
Depth of Field – range of distance in a scene which appears focused
DSLR – acronym for “digital single lens reflex,” a type of camera
EXIF – acronym for “exchangeable image file format,” which is data attached to each image that tells the type of camera, date/time, image format, and camera settings when the picture was taken
F-Stop – number representing the aperture of the camera
FPS – acronym for “frames per second,” the number of pictures a camera is able to take in one second
Golden Hour – time an hour or less before the sun goes down, when the light is more complimentary to skin tones
Graininess – when clumps of individual grains are large and irregularly spaced out in the negative or digital image, making the picture appear “grainy”
Gray Card – card used to help color correct/balance a camera before taking an image
High Key – image mainly made up of evenly lit light tones
Hyperfocal Point/Distance – the nearest point to the camera considered acceptably sharp when the lens is focused on infinity
ISO – film or digital chip speed/sensitivity designated by the International Organization for Standardization (ISO)
JPEG (JPG) – acronym for “joint photographic experts group,” an image file format standard where the size of the file is reduced by compressing it
Kelvin – a temperature scale, here used to measure color temperature of the visible light spectrum
Lens Hood – accessory that attaches as a collar to the front of a lens to prevent stray light from striking the surface of the lens, causing flare
Lossless – describes file formats which do not result in a loss of data – example: raw file format
Lossy – form of image compression when saving image that discards data from it – example: .jpg
Low Key – image that is mostly dark, higher contrasted light between the dark and the light
Macro Lens – type of lens that can focus extremely closely
Megabyte (MB, Mb, Mbyte) – a million bytes
Megapixel – a million pixels, used to describe the number of pixels that a digital device’s image sensor has
Model Release – contract where a model consents to the use of his/her images by the photographer/a third party
Monochrome – image of a single color in differing shades
(Electronic) Noise – grainy look in a digital image, usually occurring in shadowy/low-light areas
Normal Lens – lens with a focal length approximately equal to the diagonal of the film format or of a digital camera’s image sensor
Painting with Light – when a photographer incrementally lights an otherwise darkened scene using a handheld flashlight or other small light source while the shutter remains open during a time exposure
Panning – technique involving taking a picture while moving the camera at a relatively slow shutter speed
PSD – image type in Adobe PhotoShop for a “work-in-progress,” must be converted to another file type before use
Raw Image – digital image format that contains the most info possible from a camera sensor (uncompressed)
Reciprocal Rule – rule that states your shutter speed should not be slower than the reciprocal of your effective focal length to avoid blur
Reflector – any device used to reflect light on a subject
Rembrandt Lighting – portrait lighting technique which casts a triangle shaped shadow on the less illuminated side of the face
Resampling – when an image editing program is used to change the image size
RGB – acronym for “red, green, blue,” the primary colors of light
Rule of Thirds – composition rule that divides the screen into thirds horizontally and vertically to determine placement of important objects in a shot
Through-the-Lens (TTL) – refers to both exposure metering of the light passing through the lens/viewing a scene through the same lens that allows light to reach the sensor or the film
UV Filter – a clear, neutral filter that absorbs ultraviolet radiation, with no effect on visible colors
Vignetting – a fall-off in brightness at the edges of an image, slide, or print
White Balance – when the camera adjusts the colors in an image to make the image look more natural based on the objects/areas that are pure white
Zoom Lens – a lens in which focal length is variable
Timeline
Brainstorm ideas for the documentary amongst group vocally
Create a mind map for ideas on paper
Talk about production schedule
Create the shot list on Google Docs
Create the screenplay on Google Docs
Create the storyboard on paper
Scout a filming location
Block shots at location
Take continuity notes
Begin filming documentary
Start editing videos and putting together documentary
Create blog post
Project Skills Evidence
For our project we decided to make it like an old 60’s infomercial. To create the older style we edited the film to be black and white, have old background music and to look grainy and make the quality look older.
What I Learned
After creating this documentary I learned more about the film making process (preproduction, production, post-production) and how to go through each step. I also learned about how to work and film with a T3i Canon and how to set all of the basic settings. As we filmed the documentary, we ran into several problems. The first was time. There were things we wanted to add in to make it look more like an infomercial, but because of our limited time we had to cut some things out that were just “fluff” and only keep the required and necessary parts of the project. Another problem we ran into was continuity. We filmed most of our shots on one day and the rest on the next day. Because our editor was the person we had been filming, we decided to let him stay inside and edit the clips we already had so we could get it done and use a different person to film for the second day. This caused our video to have two different narrators, which disrupted the continuity.
Transcendental Awesumitude by dospaz at Flickr.com
Step #1: Summary of Project
I made a slideshow about myself to demonstrate my knowledge on how to make a decent presentation that doesn’t put people to sleep. I learned more about what the human brain pays attention to, listens to, and reacts to, which helped me put together a slideshow that not only teaches people about myself but makes the information stick. If you want to know how to make a presentation that doesn’t suck then keep scrolling!
Step #2: What is Good Presentation?
Notes
Identify the core idea of the message
“adopt a beginner’s mind”
Get away from tech in order to focus on the main idea
What’s important? does it support the core? does it help the story or distract?
Keep it simple and visual
Brainstorming
Messy but works
Grouping
Find themes and identify core
“the one thing you really want to say”
Never lose track of key message
Storyboard
Away from computer
Map out groups/ideas on paper with visuals
Why not just start on the computer?
Advantage is you can step back from it, move it around, tape it to the wall, is more real, etc.
When watching the sample presentations, the most common principle found in each was to keep it simple. One word or one picture per slide makes it easier for an audience to keep up, to understand, and to be engaged. “Make the slideshow lateral, not vertical.”
Making a good presentation is no piece of cake, you have to know what you are doing and do things for a purpose. When making a presentation, one of the key components is to make it interesting. Not many people can honestly say they’d like to watch a 64-slide presentation about a person, but if you make it engaging and memorable then it will hopefully have been worth their time. Presenting things is our way of sharing our knowledge with other people. Without presentations, we wouldn’t be able to learn as much from each other. That is why being a good presenter is a valid skill no matter what your doing, and the better the presenter, the more effectively knowledge is being shared with others.
Step #3: Brainwriting and Brainstorming Ideas
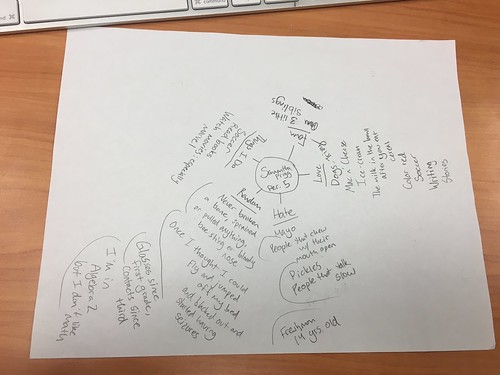
Brainwriting is a good place to start when you need to lay out your ideas. When you brainwrite, you simply make a circle in the middle with your topic and around that jot down every idea and detail about your topic that is relevant. Brainwriting is a tool to put the thoughts we have in our head out on paper, and it is the beginning step of making a presentation.
After doing a brainwrite, the next step is to brainstorm. Brainstorming is an extroverted activity, where you share ideas with the people around you to help you add to your brainwrite. That way you can write down things others thought of but you didn’t, therefore making both you and your peer’s presentations better.
Step #4: Creating the Storyboard
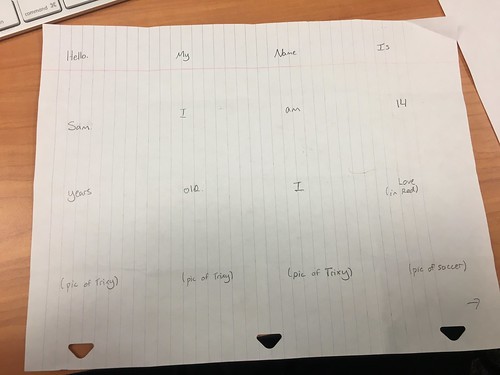
Making a storyboard is basically taking all the ideas you wrote on your brainwrite and putting them in an order that makes sense. To do this you fold your paper into sixteenths to make “slides”, and then you write your ideas in the squares as you would present them. We use the story boarding technique because it lets you organize your ideas in a way you would present it.
Step #5: Gathering and Citing Images
Citing your images is a valid step in creating a presentation, and if you don’t do it correctly then you could break the law. So, to stay away from that, get your pictures from the Creative Commons. Since you always need permission to use copy written material from the creator, we use the Creative Commons because the creators have already given permission to use their work as long as you cite them. (Copy written material is a legal term given to creators for their artistic works.)
Example of citation: Felipe Hanower. Pizza. N.d. Flickr.com. N.p., n.d. Web. 17 Sep. 2017.
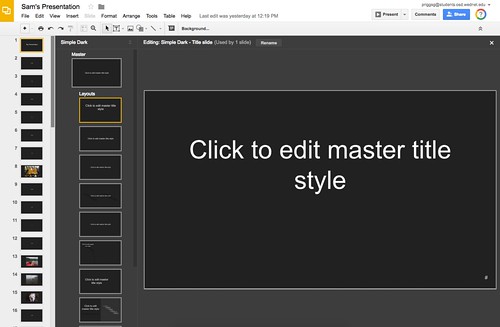
Step #6: Creating the Master Slide
Once you start to make your slideshow, you want to set the master slide first before anything else. The master slide is the formatting to the rest of your slides, so that way all your slides look the same. If your presentation doesn’t look the same, it distracts the audience and they start to only focus on what you messed up on, and not what looks good. Also, when making your slideshow remember to keep it simple, with one to two words per slide, and that high contrast is best, like white letters on a black slide.
Step #7: Building the Slide Show
You finally get to make your slideshow! When building up your slideshow, look off of your storyboard, as it is the basis of your presentation. Also, base your slideshow off of the SUCCESs Model created by the Heath Brothers in their book Made to Stick, Simple, Unexpected, Concrete, Credible, Emotional, stories. If your presentation hits each of those words, then you are on the right track. Then, create all your slides, but instead of adding in pictures put words instead, for example (pic of soccer ball), or something like that on each slide that should have a picture. This way you get the presentation done and you have the foundation and then you can go back in and add what you need to, kind of like adding icing to the cake.
Step #8: Sharing the Slide Show
Once you are ready to share your slideshow with the world, upload it to SlideShare.net because it lets anyone view your slideshow whether they have the presentation software or not. This lets you increase your audience while making it convenient for them and yourself.
Finally, you have reached the final phase, presenting the presentation. Don’t worry, if you follow a couple easy steps you will be the best presenter your audience has ever seen. First, “for every minute of presentation you need at least 20 minutes of preparation”. Basically, the more you practice with your slideshow, the better it will go. Second, only say what you want the audience to remember. Instead of focusing on saying every detail, focus on getting your core point across. Lastly, have fun with your audience! No one likes a bland, monotone presentation or presenter, so don’t be afraid to spice things up.
Step #10: What I Learned
This presentation has taught me many things that I will always keep in mind. Since presenting is such a valuable skill, the knowledge of how to be a good presenter and make a good presentation will support me for the rest of my life. When making a presentation I learned how to brainwrite, brainstorm and storyboard to help get my ideas going. I then learned how to compose a slideshow so that it is effective and impactful by keeping it simple and sticking to the core ideas. Lastly, I learned how to be a good presenter. The more you practice presenting your slideshow, the better it will flow. All in all, I learned lots doing this project and it will come in handy in my future.
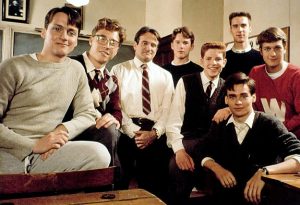
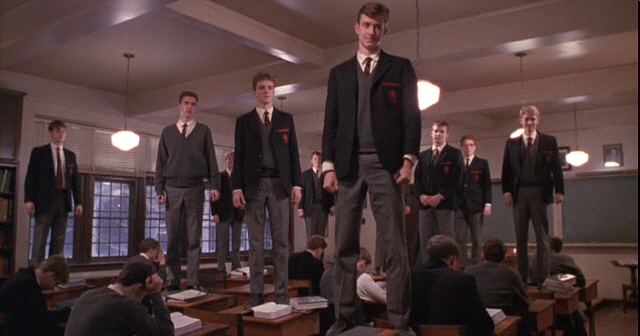
Dead Poet’s Society is a fantastic film, and if I were a movie this one best describes me.
nydailynews.com
The reason I relate to this movie is not as much the characters in the movie, but instead what the movie represents. Dead Poet’s Society is a film full of passion. Passion for poetry and school, passion for what makes us happy (like acting) and passion for other people, whether it’s a friend, a teacher, a family member or a significant other. I also have lots of passion in my life. I have a large passion for soccer, as I have played it almost all of my life. I also have a passion for stories, whether it’s a book, a film or just a story someone has told.
huffingtonpost.com
Another reason I relate to this movie is because of the camaraderie present between the boys at the school. They are all very tight-knit and trust each other with all that they have. That is what it feels like to be apart of a team, where everyone is trusting in each others abilities.